
How to Print a Class Roster
Class rosters give them user the ability to perform several tasks such as the creation of manual attendance sheets for field trips, the creation of demographics sheets for various uses, cross-checking that scheduling is complete and more. The Class Roster report can be customized using various fields during setup.
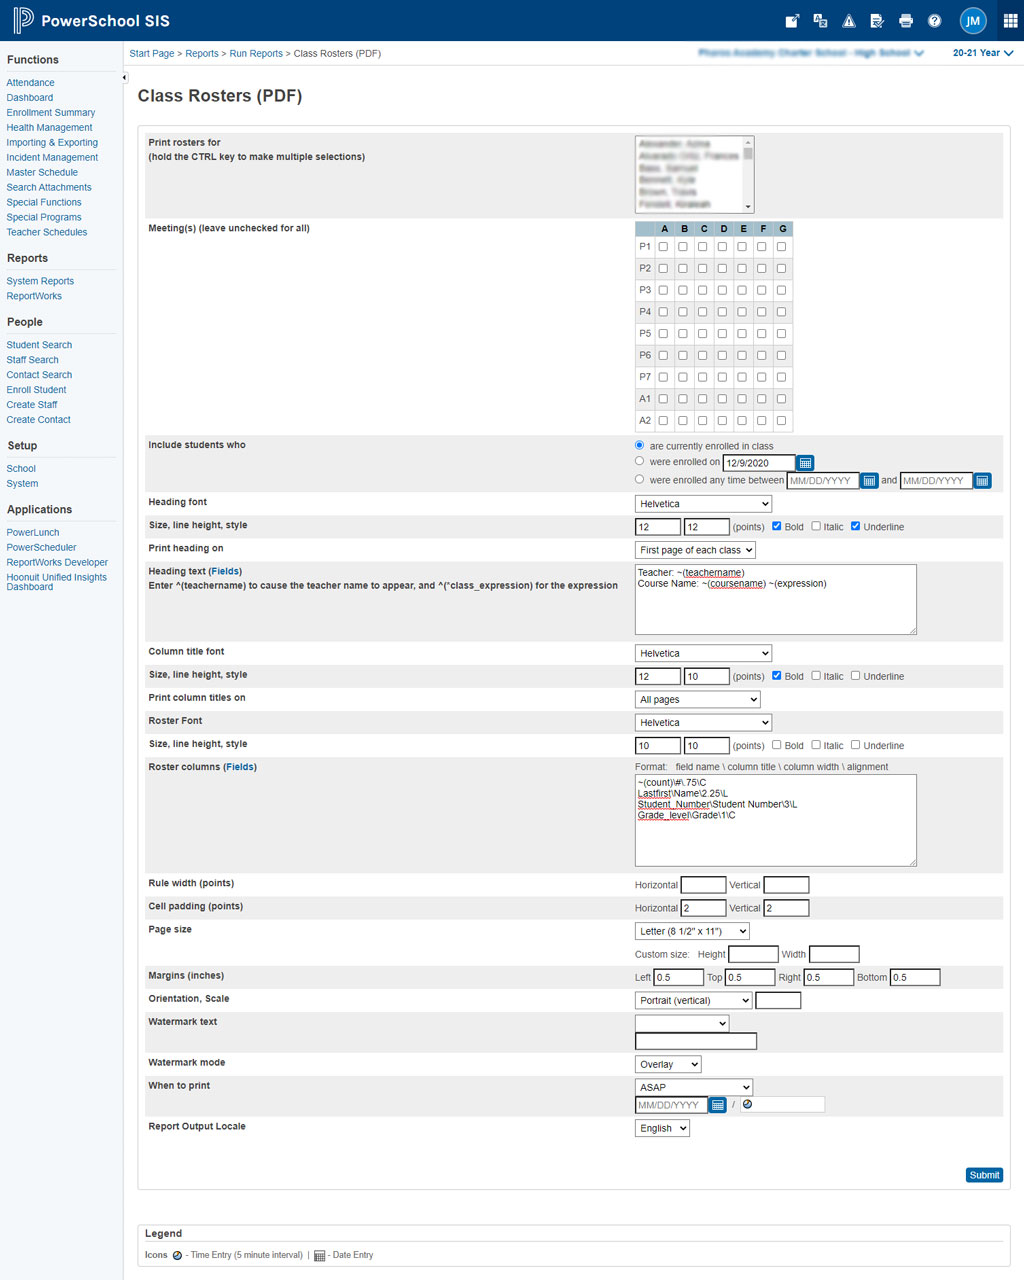
Class Roster Setup
Generate a class roster as a PDF file for the current or previous terms. Print class rosters either before or after you commit your master schedule.
- On the start page, choose System Reports under Reports in the main menu. The Reports page appears.
- On the System tab, click Class Rosters (PDF). The Class Rosters (PDF) page appears.
- Use the following table to enter information in the fields:
| Field | Description |
| Print rosters for | Select the teachers for which you want to generate a class roster. To select multiple teachers, press and hold COMMAND (Mac) or CONTROL (Windows) as you click each teacher’s name. |
| Meetings | Indicate the meetings to be audited by selecting the appropriate checkboxes. To audit all meetings, deselect all of the checkboxes. |
| Include students who | Select an enrollment period option. Some options require you to enter a date or date range using the format mm/dd/yyyy or mm-dd-yyyy. If you do not use this format, an alert appears. If you submit the date with an incorrect format, the date field is submitted as a blank entry. |
| Heading font | Choose the heading font from the pop-up menu. |
| Size, line height, style | Enter the heading font size and line height in points. One point equals 1/72 of an inch.
Select the Bold checkbox to bold the heading. Select the Italic checkbox to italicize the heading. Select the Underline checkbox to underline the heading. |
| Print heading on | Choose an option from the pop-up menu to determine how you want the heading to print:
· First page of each class · All pages · Do not print heading |
| Heading text | Enter the content you want to appear in the heading. In addition to standard text, you can include HTML tags, PowerSchool fields and PowerSchool data codes.
To insert a PowerSchool field into this field: d. Click Fields to view a list of PowerSchool fields. The Fields pop-up appears. e. To narrow the list of fields, enter one of more search terms in the Filter field. Otherwise, leave blank. f. Click the field you want to add. The Fields pop-up closes and the selected field appears. |
| Column title font | Choose the column title font from the pop-up menu. |
| Size, line height, style | Enter the column title font size and line height in points. One point equals 1/72 of an inch.
Select the Bold checkbox to bold the column title. Select the Italic checkbox to italicize the column title. Select the Underline checkbox to underline the column title. |
| Print column titles on | Choose an option from the pop-up menu to determine how you want the column title to print:
· All pages · First page of each class · Do not print column titles |
| Roster Font | Choose the roster listing font from the pop-up menu. |
| Size, line height, style | Enter the roster listing font size and line height in points. One point equals 1/72 of an inch.
Select the Bold checkbox to bold the roster listing. Select the Italic checkbox to italicize the roster listing. Select the Underline checkbox to underline the roster listing. |
| Roster columns | Enter the content to include in the student listings columns using the format field name \ column title \ column width \ alignment.
To insert a PowerSchool field into this field: j. Click Fields to view a list of PowerSchool fields. The Fields pop-up appears. k. To narrow the list of fields, enter one of more search terms in the Filter field. Otherwise, leave blank. l. Click the field you want to add. The Fields pop-up closes and the selected field appears. |
| Rule width | Enter the thickness in points of the vertical and horizontal lines on the report, as well as the outline of the entire report. One point equals 1/72 of an inch. |
| Cell padding | Enter the width of each cell and the amount of space from all sides of the cells to the text in points. One point equals 1/72 of an inch. |
| Page size | Choose from the pop-up menu the size of the paper on which you want to print this report. To enter a custom size, enter the horizontal and vertical page measurements in the Custom Size fields. |
| Margins | Enter the size of the margins in inches. |
| Orientation, Scale | Use the pop-up menu to choose the page layout. Portrait is a vertical page; landscape is a horizontal page. Scale is the finished size of the report. Fit more on a page by reducing it by a percentage, but remember to leave it as large as possible for easier viewing. |
| Watermark Text | To print text as a watermark on each page of the report, use the pop-up menu to either choose one of the standard phrases or choose Custom and enter the text you want to print as a watermark in the field. |
| Watermark mode | Use the pop-up menu to determine how you want the text to print. Watermark prints the text behind objects on the report, while Overlay prints the text over objects on the report. |
| When to print | Select a time to run the report:
· ASAP: Execute immediately. · At Night: Execute during the next evening. · On Weekend: Execute during the next weekend. · On Specific Date/Time: Execute on the date and time specified in the following fields using the format mm/dd/yyyy or mm-dd-yyyy. If you do not use this format, an alert appears. If you submit the date with an incorrect format, the date field is submitted as a blank entry. |
- Click Submit. The report queue appears.
- Click View once the report is completed.
Note: Click Refresh to update the status of the report.
The page displays a PDF file of the report. Thoroughly review it to verify that the formatting and content are correct. If the report provides the data you need and is formatted properly, print it from this page or save it to another application. For more information, see Run, Print, and Save Reports.
Suggested Fields/DAT Codes
Heading Text
Teacher: ~(teachername)
Course Name: ~(coursename) ~(expression)
Roster Columns
~(count)\#\.75\C
Lastfirst\Name\2.25\L
Student_Number\Student Number\3\L
Grade_level\Grade\1\C
*Sample of Report Parameters Page
*Portions of this document were taken from https://docs.powerschool.com/PSHSA/20.11/powerscheduler/print-schedules-and-rosters/print-class-rosters-pdf